Friday, September 23, 2016

Texture Apples

Kindergarten students are creating texture apples to decorate the art room.  As a class, we discussed the word texture and touched a variety of different materials to deepen our understanding of the word.  We gathered a sampling of different red papers, fabrics, and odd recycled goods to fill out collage apples with.
After our texture discussion, students went back to their groups and used an apple template to trace an apple shape on their paper.  Teamwork was emphasized so that one peer held the template down while the other student was tracing.  Once all students traced an apple on their paper, I demonstrated how to operate a glue stick.  Too much turning of the dial leads to a stick mess, fast.  We learned that you only need a small amount of glue and to only turn the dial when necessary.
Love these textures: rough, smooth, rubbery

Glue sticks in action!
Day two was all about embellishing these texture collage apples.  Students began by adding more texture to their apples and review gluing techniques.  Next, students used crayons to color in the empty white spaces inside their apples to add another layer of color to the stems and leaves.  Students used markers to trace and outline their apples using red for the fruit, brown for the stem, and green for the leaves.  The final step was practicing cutting skills by reviewing how to properly hold and operate scissors.  These kindergarten students did a WONDERFUL job!!!


Just look at how beautiful this texture tree came out!!

Radial Symmetry Exploration

Radial symmetry found in nature
Radial symmetry found in architecture
5th grade students were presented with these images of radial symmetry to appreciate how art and nature often mimic each other.  In radial symmetry, a pattern is repeated around a center axis. Students were given an 11x11 square paper to then fold into eight equal triangles.  We used hinge folds - folding the paper forwards and backwards on itself to make the crease more pliable - and then section off the square into eighths.  

Students were then told use their name to fill in an entire triangle.  Once the first triangle was filled in, I demonstrated how to transfer the image to the second triangle using a rubbing technique.  By applying pressure to the paper, the graphite from the pencil will appear as a mirror image in the next triangle.  This pattern of tracing, rubbing, and transferring is then repeated until all eight triangles are filled.

The beginning stages of transferring.

Look at these students go!
More to come as the projects rolls out!

Line and Pattern 3-D Fish

What is a line?  

This question began a group conversation with my 2nd grader students.  We discussed how lines are all around us - we use them to file in the hallways, help us write neatly on paper, connect dot to dots, however, we all agreed that a line can look very different when drawn on paper.  Together, we shared our ideas about lines and recorded how we see lines on a group chart.  We then labeled the examples and practiced using this vocabulary: horizontal, vertical, diagonal, zig-zag, curved, loop-d-loop, bumpy, etc. The class then transitioned back to their work areas and began using these lines to create their gigantic fish.
An example of the interactive anchor chart created by Mrs. O'Neil's class
As students began to design their fish, I demonstrated how to fill the paper.  Each student was working on a very large piece of paper - 18x24 - so I showed the class how to start with the tail on one side, then fill the inner space by drawing the fish's body, followed by adding fins to fill in the top and bottom of the paper.
LOVE the eye and eyelashes on this fish :)
This student is working hard tracing his hammer head shark!

During the second class, students began using sharpies to trace their fish and practice patterns to create the "scales" of their fish.  Students divided their fish's body into 7-8 sections and then made different line and pattern combinations in the spaces.  I modeled the first two as a group using suggestions from the class and then let students complete their fish "scales" on with their own artistic imagination.  The remainder of the class was devoted to adding color.  Students used watercolors to make a splash.
Such detailed lines and patterns

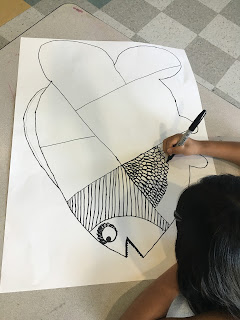
Look at those scales

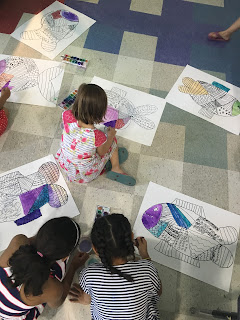
Spreading out on the floor to add color to this school of fish
More to come as these fish go from being 2-D to 3-D!

Saturday, September 17, 2016

Abstract Names

Cecil Touchon is a contemporary American artist whose body of work includes collage, painting and poetry.  His typography abstractions are especially interesting, forcing your eye and mind to slow down and admire the lines and shapes of letters.


Contemporary artist: Cecil Touchon


Fourth grade students started their lesson by observing a sampling of Touchon's work and together we talked about abstraction.  We agreed that abstract art breaks aways from the typical representation of objects and explores the relationship of color, form and meaning.  I presented students with the idea of deconstructing their name to mimic a Touchon artwork and they were rearing to go!

The first step was figuring out how many boxed areas was needed for their composition.  Students were asked to write out their name (and potentially include an important date if they needed a few extra boxes) and count each letter and number.  This then became their goal number of boxes needed to fill their composition.  Next, students practiced their ruler skills by creating a horizontal line across their paper.  I modeled how to section off the paper into different size boxes until each student had their goal number.  The next step was to begin filling in each box with one letter or number.  Students had the difficult task of making sure each letter touched a minimum of three sides.  This was important so the letter and numbers filled the box and became less recognizable and more abstract.

Students busy filling their composition with positive and negative coloring

Love this student's technique!


How awesome are these!!!

Paul Klee Inspired Cats


Paul Klee

Swiss painter, Paul Klee, was best know for his Surrealist works of art.  His use of imagery and color truly strike a chord with children.  Blogger Deep Space Sparkle has some fabulous ideas on how to incorporate Paul Klee into the classroom.  Below is my take on Klee's Cat and Bird, painting and first grade artists.


Cat and Bird
Paul Klee
1928
First grade students began this lesson by slowing down the pace and looking deeply at the Klee's, Cat and Bird painting.  We discussed how Klee was instrumental in the Surrealist movement and that surreal meant representing dream like scenes.  We admired the cat and tried to make sense of the significance of the bird, floating circle and hypnotic eyes.  The class really got deep into the conversation!  

Afterwards, students used their sketchbooks to practice making a Klee inspired cat.  I modeled to the class how to use simple shapes and letters to draw the cat's face and how to fill the paper.  We used a "W"  for the face, a "U" for the tongue, a heart and upside-down letter "V" for the nose, and "rainbow lines" for the arches of the cat's eyes. 

The second class, students then made their final drawings.  Each students picked a colored piece of construction paper and I guided the group with the same demonstration on how to make their surreal kitty.  Klee's use of color stretches the imagination.  We explored pastels as the medium for color and how to use the pastels properly.  I demonstrated how to put the pastel on its side and use the edge of the pastel to color in the space.  Then I used my fingers to smudge the pastel and fill in the space.  Students we instructed to switch colors for each section of their cat similar to the style Klee used in his artwork.  The results are magical!
LOVE this fuchsia tongue!
Great smudging technique!


Friday, September 2, 2016

Getting Started

This year I'm excited to be joining the Glover Elementary school as a part-time visual art teacher. I've inherited this amazing art room and plan on documenting the year through this blog.  The pictures below represent the expectations of the room.  

Students are expected to be A.R.T stars while in class.  It is their responsibility to come into class with a great Attitude, be Respectful to peers, materials and the classroom, and to always Try Your Best!


Students are expected to take an active part in the art room.  It is important for students to understand that the key to a successful art room is keeping materials tidy and sharing the responsibility of the distribution and clean-up process. This system has six essential jobs for students to participate in. Tables are assigned a job for the week and each week the jobs will rotate so that all students share in these procedures.  The jobs are as follows:

Supply Distributor
Supply Collector
Table Inspector
Floor Inspector
Artwork Collector
Critique


Students will be able to see what project they are working on by observing the Today's Focus board.  On this yellow and purple grid, classes are divided into grade level and examples of each project will be on display.  Standards and key vocabulary will be posted as well.  In addition, the purple Artistic Word Wall will post a culmination of art vocabulary learned throughout the year.  


Upon exiting the room, classes will have an opportunity to reflect on their A.R.T behaviors and assess whether or not the class earned a sticker for their efforts.  The above check list is a tangible way for students to see if the group followed the room's expectations.  If the class fulfills at least 5 out of the 7 expectations then they earn a sticker.  After the class earns 10 stickers, they can earn an incentive such as free time, music, or even choice of seating.

This is going to be such an exciting year of art making at the Glover School.  Come back often to see all the amazing art that will be created in Room 12!!!