Showing posts with label 2nd Grade. Show all posts

Thursday, October 12, 2017

BIG Line Faces

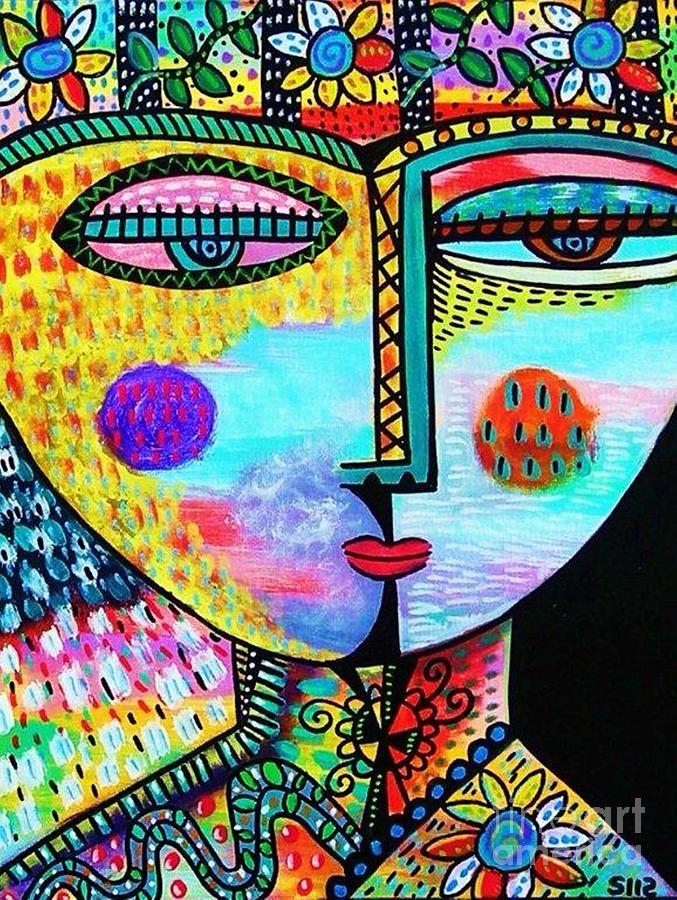
Sandra Silberweig

Sandra Silberzweig is a Canadian born artist who uses bold colors and lines to capture life around her.  Students started this project by identifying all the lines they could see in Sandra Silberzweig above portrait. We found the following lines:
Horizontal
Vertical
Diagonal
Spiral
Zig-zag
Curved
Dotted
Bumpy... just to name a few!
We then set off to work by using those line and FILLING our paper.  We mapped out a face starting with the nose, chin, neck, eyes, lips and then adding lots and lots of patterns in details.
   
Next, students used two layers of color to their faces.  They began by using oil pastels to add texture and bold sections in their work.  This was then followed with painting with tempera cakes.  We focused on using lots of water to help s-t-r-e-t-c-h the color across the paper.  
   
Absolutely stunning when you see all the faces together!


Thursday, September 28, 2017

Adventures in Clay

Disclaimer: These adorable clay critters are from the 2016-2017 school year.  

Pinch pot fish - 4th grade

Owl wall hangings - 2nd grade


Friday, January 6, 2017

Owls in the Night


Add caption
2nd grade students embarked on a twilight themed picture based on this fall's super moon and illustrations from the book, Twinkle, Twinkle, Little Star by, Jane Cabrera.  Students began by making a painterly background using long brush strokes of blues, purples and white for the sky.  It was encouraged to let the mixing of the paint happen on the paper rather than their pallets to achieve and expressive brush stoke that resembles wind or movement in the sky.   Next, students focused on making owl feathers using the same brush stroke techniques.  We wanted to make the brush strokes resemble individual feathers instead of one solid color.

On day two, students began their collage making.  They manipulated brown paper by crumpling to create texture for the bark of their tree branches.  Then, students drew gigantic letter "U"s onto the feather print paper to make the body for their owls.  After cutting the "U" out, any scrapes of paper was then used for wings.  They then traces concentric circles for the owls' eyes and jazzed them up by using oil pastels to make designs.  

 I just love how focused these students are working!


The final touch was adding stars to the night skies.  I can't stand how adorable these owls are!!!

Wednesday, December 7, 2016

Apple Advertisement


Fall is in the air and what better way to celebrate the change of season then by making some apple stampin' art.  Students observed some different colored apples, green, red, and yellow, and noticed how some apples had streaking of multiple colors.  We then cut some apples in half and began stamping away.  

While the paintings were drying, we began to talk about texture and  how we can notice texture both by touch and with sight.  I gave the class some cardboard and we made a textured background for our project by rubbing the cardboard behind the paper.  Next, we took the same cardboard and ripped the to layer of paper off to create a texture of a basket and glued it down to the project to make a still life.


The next week it was time to put all the pieces together.  The apples needed to be cut and then assembled into the basket.  The final touch was stamping the word APPLE on the top to resemble a fruit box advertisement.  Aren't these pictures delicious!


Friday, September 23, 2016

Line and Pattern 3-D Fish

What is a line?  

This question began a group conversation with my 2nd grader students.  We discussed how lines are all around us - we use them to file in the hallways, help us write neatly on paper, connect dot to dots, however, we all agreed that a line can look very different when drawn on paper.  Together, we shared our ideas about lines and recorded how we see lines on a group chart.  We then labeled the examples and practiced using this vocabulary: horizontal, vertical, diagonal, zig-zag, curved, loop-d-loop, bumpy, etc. The class then transitioned back to their work areas and began using these lines to create their gigantic fish.
An example of the interactive anchor chart created by Mrs. O'Neil's class
As students began to design their fish, I demonstrated how to fill the paper.  Each student was working on a very large piece of paper - 18x24 - so I showed the class how to start with the tail on one side, then fill the inner space by drawing the fish's body, followed by adding fins to fill in the top and bottom of the paper.
LOVE the eye and eyelashes on this fish :)
This student is working hard tracing his hammer head shark!

During the second class, students began using sharpies to trace their fish and practice patterns to create the "scales" of their fish.  Students divided their fish's body into 7-8 sections and then made different line and pattern combinations in the spaces.  I modeled the first two as a group using suggestions from the class and then let students complete their fish "scales" on with their own artistic imagination.  The remainder of the class was devoted to adding color.  Students used watercolors to make a splash.
Such detailed lines and patterns

Look at those scales

Spreading out on the floor to add color to this school of fish
More to come as these fish go from being 2-D to 3-D!

Friday, September 2, 2016

Getting Started

This year I'm excited to be joining the Glover Elementary school as a part-time visual art teacher. I've inherited this amazing art room and plan on documenting the year through this blog.  The pictures below represent the expectations of the room.  

Students are expected to be A.R.T stars while in class.  It is their responsibility to come into class with a great Attitude, be Respectful to peers, materials and the classroom, and to always Try Your Best!


Students are expected to take an active part in the art room.  It is important for students to understand that the key to a successful art room is keeping materials tidy and sharing the responsibility of the distribution and clean-up process. This system has six essential jobs for students to participate in. Tables are assigned a job for the week and each week the jobs will rotate so that all students share in these procedures.  The jobs are as follows:

Supply Distributor
Supply Collector
Table Inspector
Floor Inspector
Artwork Collector
Critique


Students will be able to see what project they are working on by observing the Today's Focus board.  On this yellow and purple grid, classes are divided into grade level and examples of each project will be on display.  Standards and key vocabulary will be posted as well.  In addition, the purple Artistic Word Wall will post a culmination of art vocabulary learned throughout the year.  


Upon exiting the room, classes will have an opportunity to reflect on their A.R.T behaviors and assess whether or not the class earned a sticker for their efforts.  The above check list is a tangible way for students to see if the group followed the room's expectations.  If the class fulfills at least 5 out of the 7 expectations then they earn a sticker.  After the class earns 10 stickers, they can earn an incentive such as free time, music, or even choice of seating.

This is going to be such an exciting year of art making at the Glover School.  Come back often to see all the amazing art that will be created in Room 12!!!